Installation
1. Continue button is disabled (greyed out):
To activate this button, you have to scroll down the licence agreement.
2. How do I uninstall the program?
We recommend you to use one of the two methods below to remove the software from your system:
The "Uninstall" option next to the application itself in the Windows Start Menu
"Add remove program" from the Windows Control Panel.
In order to check if the removal was complete, you may do a search on the programs name. Then delete the found components manually. This will usually be C:\Program Files
NOTE: Remove the installation CD before doing the search.
3. Download issue
The username & password should not be necessary to access the FTP link. Use Firefox to bypass the need for that. Go to www.mozilla.com and download and install this alternative to Internet Explorer. Copy and paste the link below into the Address bar (not search) and hit the enter key on your keyboard. Save to your desktop where you can then double click to start the installation.
4. Can I upgrade my previous version of Readiris™ to version 12?
Here is a table explaining the upgrade conditions of a previous Readiris™ version to version 12.
| FROM / TO |
Readiris 12 Pro Upgrade |
Readiris 12 Corporate Upgrade |
Readiris 12 Pro Asian Upgrade |
Readiris 12 Corporate Asian Upgrade |
| Readiris 12 Home |
 |
|
|
|
| Readiris 12 Pro |
|
|
|
|
| Readiris 12 Corporate |
|
|
|
|
| Readiris 12 Pro Asian |
|
|
|
|
| Readiris 12 Corporate Asian |
|
|
|
|
| Readiris 11 Pro |
 |
|
|
|
| Readiris 11 Corporate |
|
|
|
|
| Readiris 11 Pro Asian |
|
|
|
|
| Readiris 11 Corporate |
|
|
|
|
| Readiris 10 Pro |
|
|
|
|
| Readiris 10 Corporate |
|
|
|
|
| Readiris 10 Pro Asian |
|
|
|
|
| Readiris 10 Corporate |
|
|
|
|
| Previous Version |
N/A |
N/A |
N/A |
N/A |
|
Activation
1. I cannot register my copy of Readiris™ 12 Corporate Middle East and am getting : An error occured in the activation process
If you are behind a firewall, make sure TCP port 5094 is open.
If you are allowed or not sure about how to perform this action, please contact your System Administrator as this may depend on various factors including OS, firewall and security factors
2. I get the message that my product has already been activated 3 time
You may receive this message for two possible reasons:
- Your have encoded a wrong serial number (e.g. 765010… or 65010…)
To solve this issue, you have to:
- Launch the software
- Click on register now
- Correct the serial number (also called license number) with the good one
- You have actually activated your product three times
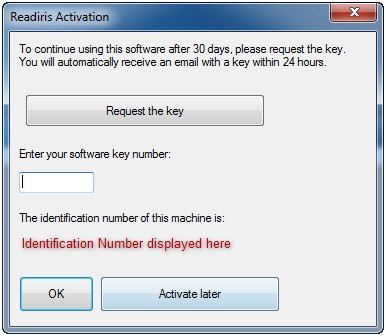
Only Corporate Edition and ESD versions of Readiris™ require such a software key. After three automatic activations, you need to contact us via the support contact webform if you need to activate the software again. To generate the key we need the identification number that is displayed in the window where the key will have to be entered. E.g. "The identification on this machine is..." or "The identification number on this PC is..."
3. Invalid software key
You may receive this error message if you have re-installed Readiris™. You will need to request a new software key.
To get a new software key, register your product via the registration form: www.irislink.com/support. Do not forget to fill in the form with your identification number and a valid email address.
The identification number can be found when you choose "register now" on start up of the program and when you click "ok" after having inserted your serial number. Then, a dialog box will appear with 'the id. num. of this computer is...'. watch a video, which explains how to register Readiris™.
4. How do I get a software key??
When you start the Readiris™ software for the first time you will be asked to enter your serial number.
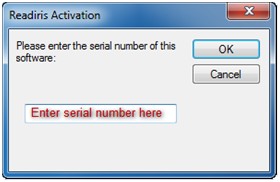
You can use Readiris™ for 30 days without an activation key by choosing Register Later when the program starts up
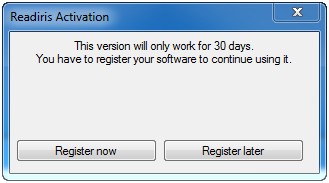
To get the key choose Register™ now and you will have these options.
- Click on Request the key button to send the key request. A key will be emailed to you within 24 hours
- Copy the Identification number at the bottom of the screen and send it by return email and we will generate the key.
 |
Usage and configuration
1. No windows defined / There are no windows to be recognized on this page
No windows defined" means that no zones were drawn to identify the text and other elements on the scanned document. Here are listed different reasons why you could have that message:
- The page is not placed in the correct position and must be reversed.
- The page is upside-down and must be rotated at 180°
- No text could be defined because all the text on the original document is not enough contrasted (ex: dark characters on black background)
- If you have only 1 blue frame (graphic frame) or no frames over the scanned image document and Readiris™ thinks then that it's only one big picture.
- There is no text on the scanned document (e.g. a speckled white/blank page)
Readiris™ draws boxes around your document to indicate that it has identified text, images, tables or optionally barcodes and hand printing on your document. These boxes or zones are necessary to process the document correctly. If a zone is not present over a section then that area is ignored in the output and will not be included. By and large the program correctly identifies the elements on the page so just click "Recognize and Save" button, on the left side of the screen, to perform the recognition or conversion on your document
2. Administrator rights are required to run this software for the first time
By default, on Windows Vista and Windows 7, you are administrator of the computer. But you are a limited admin. There is still a hidden administrator account, which has full elevation and full permission. While your account does not. Some programs require to be launched with full elevation.
In order to do so, right click on the icon of the program and select 'Run as administrator'. You can also right-click on the program shortcut and select properties. On the shortcut Tab click the advanced button and check the "Run as administrator" checkbox.
3. How to improve the results in Readiris™?
Good recognition results are directly tied to image quality. If the input image is poor then so will be the results. The software works by converting pictures of character shapes into actual text. It the characters are touching or filled in because they are too dark or are broken up because they are too light then the software won't give you good results. It may in fact treat the text as an image with no conversion.
To improve the results you get using Readiris™, you should scan your document at 300 dpi in grayscale. By doing so, the image adjustment option will be available to help you process dark or light images. First go to the View menu and uncheck display documents in color. Go to view again and click on Actual Size. This will blow up the image so you can see the letter shapes to gauge how light or dark they are. When you inspect the document, the letters should not be touching each other, nor should they be filled in, faded or broken up.
Next go to Process on the file menu and choose Adjust Image. Move the brightness/Contrast slider and click apply. Repeat until satisfied with the appearance and then click OK
4. Why doesn't the program work with all fonts?
The software works by comparing pictures of letter shapes to a database of known letter shapes. There are thousands of different kinds of fonts. Due to that it is impracticable to have every font type in the internal database. Moreover cursive, calligraphic or gothic fonts are not supported.
5. How do I use a template in Readiris?
The layout option is used to create templates and is most often when you want to apply the same zoning across a range of images. For books, manuscripts or legal documents a single orange text zone often produces the best results.
a. Document already scanned
- Delete the current zones go to Edit
- Select All and then tap the delete key on your keyboard
- Draw the desired zones on your image
- Go to file Save Layout. Give it a descriptive name
- Go to File > Load Layout, choose the file you just saved
Check the "apply to all pages check box" if you want it applied to all images.
b. Document has not yet been scanned
- Go to menu "Settings"
- Uncheck the option "Page Analysis"
- Draw the desired zones on your image
- Go to file Save Layout. Give it a descriptive name
- Go to File > Load Layout, choose the file you just saved
Check the "apply to all pages check box" if you want it applied to all images.
6. Readiris™ is scanning only the first 50 pages of my document
Readiris™ Pro can process up to 50 pages at a time.
Readiris™ Corporate has no page limit, and also includes more features like automatic file conversion without any clicks (also called "batch OCR" or "watched folder").
/readiris
If you are opening a file in Readiris™, a way around the page limitation is to open a specific range of pages in the open dialog in Readiris™.
7. I get the error "Cannot Open TWAIN default"
Readiris™ does not load any drivers of its own; it instead makes use of the driver installed with the scanner software
See article "how do I configure my scanner with Readiris™?"
8. Excel Output
Usually the conversion problem in Excel is the grid lines. When they are incomplete or broken in the image then the software does not know what to do with those line fragments.
It is preferred to set it to Excel (*html) and the Layout to create body text by either clicking on the Format button on the left bottom or right clicking on the smart task in the center of the screen.
9. Readiris Output File Formats
There are two separate ways to output from Readiris™. Either in the Send to, which uses a script to send the results to the output application or in the External File which saves the file and opens it in the associated application.
Note: for the "send to" option: the target application should be installed on your machine.
PDF
Portable Document Format is a file format created by Adobe Systems Inc to enhance document exchange. Documents in PDF are independent from device and display resolution and can be read on any operating system (Windows, Macintosh, and Linux). These files are a combination of vector graphics, text, and raster graphics. They support links (internal and external), forms, JavaScript and 3D objects. PDF documents may have different levels of encryption (view, print, select…) and even DRM. Since the 90's, Adobe's PDF has become the standard file format for document exchange. Readiris™ supports four different configurations. This format is used for documents for storage or transmittal where editing the text is not needed.
Image over Text - Used for most purposes. Image of document overlays converted text.
Text over Image - Rarely used but maintains unified images in the background for easy capture by desktop publishing programs.
Text only - No image layer, only converted text.
Image only - No text layer.
RTF
Rich Text Format is a free document file format developed by Microsoft in 1987 for cross-platform document interchange. Most word processors are able to read and write RTF documents. Most word processing software supports RTF format import and export, often making it a "common" format between otherwise incompatible word processing software. RTF is capable of the same formatting precision as Microsoft .doc format without the threat of macro viruses. RTF is used by default in Readiris™ for documents sent to Microsoft Word and is appropriate when the goal of the conversion is to edit the final document or repurpose the text. Readiris™ provide options to choose what level of formatting accuracy is desired.
- Create body text
Use this option if you don't want Readiris™ to format your document. You get continuous, running text with no differences in fonts or font sizes. All formatting, if any, is done afterwards by the user.
- Retain word and paragraph formatting
This option keeps the general format structure of the scanned document. However, no graphics are captured, the text blocks and columns aren't recreated - the paragraphs just follow each other. The tables are recaptured correctly.
- Recreate source document. This option will make a true copy of the document you just scanned. The text blocks, tables and graphics are recreated in the same place, and the word and paragraph formatting are maintained across the document. These sub options are available depending on what degree of final editing is required.
- Use columns instead of frames Uses columns instead of text boxes (frames) to position the information on the page
- Insert column breaks Confines text to the column where located instead of flowing to the next column
(DOCX)
Word Markup Language was introduced as the standard format in Word 2007 and continued in Word 2010 and is based on XML (extensible markup language) replacing the binary format used in previous versions of Word. Available only using the external file option.
DOC
A binary format containing text formatting information (as well as scripts and undo information) used by Microsoft Word versions prior to Word 2007.
Available only using the external file option.
HTM
Hypertext markup language is the predominant markup language for web pages. It provides a means to describe the structure and formatting of text-based information in a document. This format can be used my Microsoft Excel or a Web browser such as Internet Explorer. Additionally it can be used to send the result to a web page editor like Adobe Dreamweaver. When used for Excel there are two relevant formatting options.
- Create body text
Straight text using the same font and font sizes. There will be no text wrapping or merging of cells.
- Retain Word and Paragraph Formatting
Maintains fonts and font sizes. Text wrapping and merging of cells will be used to position elements on the page
Spreadsheet ML
SpreadsheetML is an XML dialect developed by Microsoft to represent information in an Excel workbook. It was introduced in Excel 2003 and is the default format in Excel 2007 & 2010. The same formatting options for html also apply here. In this format there are these additional options.
- Ignore all text outside of tables
Will include only the spreadsheet itself, no information outside the grid will be included
- Convert Figures into numbers
Numbers as text will be converted to numbers
- Create one worksheet per page
One worksheet is created per scanned page. If a page contains tables and text, all will be placed on the same worksheet.
- Create one worksheet per table
One worksheet is created per table in scanned page(s). Useful for tables of different sizes or headings
CSV
Comma Separated Value is a text format for storing tabular data which uses a comma to separate values. It is usually associated with Excel on Windows machines. Since it can only display a single table it is sometimes referred to as a flat file.
TXT
Comma Separated Value is a text format for storing tabular data which uses a comma to separate values. It is usually associated with Excel on Windows machines. Since it can only display a single table it is sometimes referred to as a flat file.
- ANSI or ISO-8859
A single byte format for display and editing of plain text using Latin characters. Traditional format used for Window now being replaced by Unicode
- UTF-8 or Unicode
A double byte format capable of displaying Asian, Arabic or Cyrillic characters along with the traditional Latin character set.
The next discussion is how to decide what format to choose
10. HP I.R.I.S. OCR
The Readiris soft comes bundled in one of two ways; either as a standalone software or integrated into the HP software. The way to tell is go to Start > All Programs > Iris Applications. If the only thing in there is the Iris OCR registration wizard then it is the integrated version. To use it you would launch the HP Solutions Center and start a scan. You will be presented with the choice of scan picture or scan document. With that latter choice you would choose editable text and either word or file as the output option
- Scan document settings
Importing text without retyping is a powerful feature of your HP all-in-one. To get the best possible results from your scan, use the scan document settings to control how the Optical Character Recognition (OCR) software recognizes the text. For example, let's assume that you want to modify a brief document that you typed a few months ago, but you cannot find the original file. The document is in black and white and does not contain graphics. You would like to scan the document and then modify it with your word processor. What settings would be the best to use and how would you select them? Before changing any settings, identify what type of document you are going to scan. Documents that you scan using your HP all-in-one fall into one of the following categories:
- Text & Graphic(s) as Image: A scanned item with a combination of text, photos and color graphics that retains formatting and layout. This image type gives you some flexibility. You can work with the entire scanned image, or select just a portion of the image to use as Photo or Text. A magazine page layout is a good example of a commonly scanned mixed image. The default resolution setting for this type of image is 200, and the default output type is millions of colors (24-bit).
- Text as Image: A block of text with formatting that you would like to preserve. Select this type when you want to keep the original layout, but don't need to edit the text (when scanning a newspaper article, for example). The default resolution setting for this type of image is 200, and the default output type is 256 gray shades (8-bit grayscale).
- Editable Text: Text that you plan to use in a word processing program. When you scan the text, the program uses a process called Optical Character Recognition (OCR) to transform it into an editable electronic file; without retyping. Remember, you will lose all of the original design and formatting when using this option. The default resolution setting for this type of image is 300, and the default output type is 256 gray shades (8-bit grayscale)
- Editable Text with Graphic(s): The default resolution setting for this type of image is 300, and the default output type is millions of colors (24-bit).
Using our earlier example of a text-only, black and white document, you would be working with an Editable Text image type. Since you will be printing this document, you may want to change the default settings slightly.
- If you have not already done so, open the HP Director and click Settings, point to Scan Settings & Preferences, and click Scan Document Settings.
The Scan Document Settings dialog box appears
- Choose the appropriate setting from the Resolution list. For our example, you might select 400 ppi since you intend to print the final document
- Choose the correct Output Type setting. Using the same example, you should retain the default 256 Gray Shades (8-bit grayscale) setting since you are working with black and white text
- Click Apply to save the new settings on this tab, and then click the Editable Text Settings tab
- Since we're working with Editable Text, you will need to decide whether you want to use the Framed or Flowed Text setting. Select one of the following:
- Framed Text retains the layout and formatting of the original document as much as possible. Minor changes to the text are easy, but major editing or reformatting can be difficult because the blocks of text are in separate frames. Some simple word processing programs (such as Notepad) do not accept the Framed Text formatting.
- Flowed Text arranges all the text components in a single-column flow. You lose the page layout information, but the document is easier to reformat and edit.
- Choose the appropriate language in the OCR Language list
- Click OK to save the new settings and close the dialog box
- Click Scan Document in the HP Director to scan using your new settings, or click a Scan button on the HP all-in-one front pane
11. How do I configure my scanner with Readiris™
There are two places to set the scanner in the program. This assumes that
· Check if you have installed the latest available TWAIN drivers for your scanner / Windows combination.
· The scanner is connected to the computer and switched on.
- Go to File > Select source. This is the most important because this is where you choose which device you want to use from the list that may be connected to your computer. That can include scanners, cameras or web cams. There should be a specific choice for your scanner. If this window is empty then the scanner driver never got loaded. Install from your scanner CD or download from the manufacturer's website
- Go to Settings > Scanner > Scanner Model. This is to set a profile to be used with the item selected above. Not all scanners have specific profiles in which case you use a generic profile. In most cases you will use HP other models (TWAIN) or TWAIN Other Models If your scanner has an automatic document feeder look for the ADF check box which is the on/off switch for using that feature.
NOTES: I.R.I.S. does not provide drivers as they are designed and engineered by your scanner manufacturer. Contact the scanner support for further help with the installation of the scanner drivers.
12. Readiris™ Format settings
The Readiris™ is OCR software that can convert your scanned image into a text document. The first thing it does is analyze the page and puts color coded boxes over various sections of the document to tell you what it intends to do with the various sections if converting to a text based format. Create body text. Use this option if you don't want Readiris to format your document. You get continuous, running text with no differences in fonts or font sizes. All formatting, if any, is done afterwards by the user. Retain word and paragraph formatting. This option keeps the general format structure of the scanned document. However, no graphics are captured, the text blocks and columns aren't recreated - the paragraphs just follow each other. The tables are recaptured correctly. Recreate source document. This option will make a true copy of the document you just scanned. The text blocks, tables and graphics are recreated in the same place, and the word and paragraph formatting are maintained across the document. These sub options are available depending on what degree of final editing is required.
- Use columns instead of frames
Uses columns instead of text boxes (frames) to position the information on the page
- Insert column breaks
Confines text to the column where located instead of flowing to the next column
Example: with Microsoft Word.
These boxes can be manipulated and change to suit your needs.
This is not perfected technology because of the nearly infinite variations in text, formatting and image quality. Because of that it is inevitable that there will be some mistakes when sending to Word.
If you are getting boxes in the Word document then make this settings change in Readiris and reprocess.
Go to Settings > Text Format and look under the layout Section/Tab. If only the Recreate source document is selected then it uses text boxes to position the elements on the page.
The solution is either to check the Use columns instead of frames or revert to Retain Word and Paragraph formatting.
13. Color coded boxes (zoning)
When the image is scanned or opened in the program the first thing it does is analyze the page and places numbered and color coded boxes or zones over various parts of the page to tell you what it intends to do with those areas. In general the program correctly identifies how each area should be converted. However with logos or signatures it may try to convert it to text when they would be better brought over as pictures. Likewise with tables it may treat it as individual text areas when it should treat it as one spreadsheet type of area.
*Text = Orange
*Picture = Blue
*Table = Purple
(color codes for Readiris 12)
If you need to adjust these you can do the following.
- Right click on the zone and choose Window > Type and select the correct format.
- To delete all the zones click on the document first and go to Edit > Select all and tap the delete key on your keyboard. Use the tools on the upper right hand side draw in your own zones. Note that zones drawn that overlap will merge which is handy for including irregular shapes or joining separate zones into one.
To apply the zoning over a range of pages use these steps.
- Go to File > Save Layout, give it a name and put it in a known location
- Go to File > Load Layout, choose the file saved above and check the apply to all pages box then click on open.
14. My scanner model is not listed
Not all scanners have specific profiles in which case you use a generic profile. In most cases you will use HP <other models> (TWAIN) or <TWAIN> <Other Models>
15. How do I select the scanner?
Readiris can only access the scanner if TWAIN drivers are correctly installed.
Select your scanner model from the list under Menu > Preferences > Source
* Then in the preferences of readiris, you should see the scanner and so scan directly from the program.
NOTES:
1. Please check if you have installed the latest available drivers for your scanner / Mac OS combination.
2. IRIS cannot provide third party scanner drivers, as they are designed and engineered by the scanner manufacturer
3. Contact the scanner support for further help with the installation of the scanner drivers.
16. I cannot see my scanner into Readiris 12 under Snow Leopard
To see your scanner into Readiris™ Preferences, you have to :
1. be sure to have installed the latest driver compatible for OS X 10.6 [Check the Apple knowledge base to see if your scanner is an image capture scanner. https://support.apple.com/kb/HT3669 ]
2. Is the driver correctly installed in the appropriate directory
HD => Library => Image capture => TWAIN data source
By default on Snow Leopard, the Readiris application is launched in 64-bit mode.
If your driver is not 64-bit compatible, you won't see it.
So you have to open the Readiris application in 32-bit mode. To do that, go to :
• Applications folder > Readiris Pro 12 > get info on Readiris.app > check the box "open in 32- bit mode "
• Launch Readiris™ > select your scanner in the dropdown
17. Image Capture scanners not appearing in preferences list
· Make sure the check button is enabled
· Menu Readiris™ > Preferences > ""enable Image Capture Scanners"
· Check in the Image Capture application is detecting the scanner. All scanners visible in the Image Capture application should be seen by Readiris too.
· Unplug and replug USB connection, restart, check supported models on https://support.apple.com/kb/HT3669
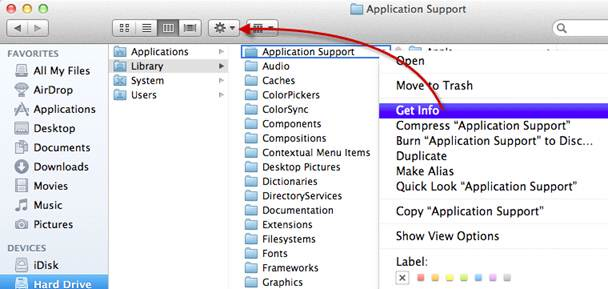
18. Administrator rights are required to run this software for the first time
If you are having this error message when you launch Readiris:
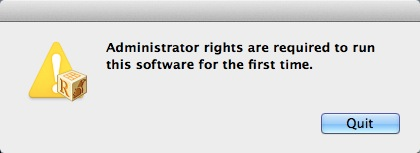
Please follow the procedure:
- Verify and repair the disk permission using the disk utility.
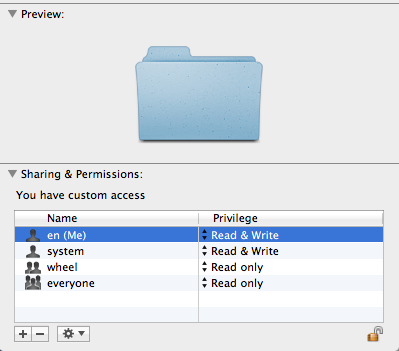
- If the issue still occurs modify the permission of the Application support folder [ \Library\Application Folder ]. Open finder and go to Hard Drive => Library => Application Support. Highlight and click on the gear and choose Get info. If necessary display your hard drive icon by going to the Finder menu > Preferences and check the box for hard disk.
In the Get info window go to the bottom and click on the padlock and enter your password. Change the permissions to Read & Write for the logged user (here in the example: it is en(me))and close the window.
|
|


